In summer, the Micawber fancy lightly turns to thoughts of ... small pretty projects, preferably involving beads.
What could be better for summer crochet than a beaded bracelet? Cool and cottony, prickled with bright bits of colour, the Sea Anemone Bracelet is quick, portable, and fun. (Choosing your beads will probably take longer than the actual stitching).
I made two:
 |
| One for me, and one for a friend. |
Size: Custom
Yarn Requirements:
10-12 yards of DK weight cotton yarn (or 24 yards of #10 crochet cotton held double)
Yarns I Used:
Planet Penny Cotton Club (Lime)
Patons Grace (Orchid)
Hook Size: D/3.25mm
Notions:
1 Button, 1/2" to 3/4"
Beads, size 6º or E, in 2 colours (see "Calculating the Beads" below for quantities)
Darning needle
Optional: wire beading needle OR bit of thin beading wire
How Did the Yarns Behave?
Perfectly for this project. Both have a lovely sheen and gave wonderful stitch definition.
All crochet terminology is American.
Calculating the Beads:
Measure your wrist (or the wrist of the recipient). Since cotton yarn stretches and relaxes with wear, a snug fit is recommended. (Rather like buying jeans.)
From the wrist measurement, subtract 1/2" for clasp.
Multiply the remainder by 2, to determine the number of motifs. (There are about 2 motifs to an inch.)
For example: the purple bracelet in the phototutorial is for a friend with a 6" wrist. This is how I calculated the beads for that bracelet:
6" (wrist measurement) - 1/2" (for clasp) = 5-1/2" (or 5.5)
5.5 x 2 = 11 motifs
Of edging beads, you will need:
8 for the button pad
+ 6
per motif
+ 5 or 6 for the button loop
Of accent beads, you will need:
2
per motif
See below for bead stringing order.
Stringing the Beads:
This is most easily done with a wire beading needle; if you don't have one, you can make your own from a bit of fine wire twisted like this (be sure to leave a loop at one end for the yarn to go through):
You can also use a regular needle - it must be big enough to hold your yarn but small enough to pass through the hole in your beads.
To string beads without a needle, you can brush a little nail polish onto the end of your yarn to stiffen it (glue or wax would work as well - thanks to my friend
Snowcatcher for this idea).
String the beads in this order:
7 edging,
(2 accent, 6 edging) for
each motif,
2 accent,
12 edging
(This will give you an extra motif's worth of beads which may be removed later if necessary.)
A tip for crocheting with beads:
Bead crochet involves a lot of sliding the beads back and forth as you work - you want the bulk of the beads to be far enough away that you have some yarn to work with, but not so far that you can't easily get them when you need them. I slide most of the beads about 2-3 feet down the yarn, but try to keep about 8 beads within easy reach of my fingers. One advantage to having beads on your yarn: it's less likely to tangle! (You could also put the yarn into a zip bag or yarn bowl - more good ideas from
Snowcatcher.)
Stitches and Abbreviations in order used:
Chain (ch)
Ch w/beads - slide a bead down to work before making ch st
Linked Double Crochet (ldc) - see Phototutorial for instructions
Slip Stitch (sl st)
2-Triple Crochet Cluster (2-tr cl)
Double Crochet w/beads (dc w/beads) Yarn over, insert hook where indicated, pull up lp; (slide bead down to work, yo, pull through 2 loops) twice. Uses 2 beads.
Sea Anemone Bracelet Shorthand Pattern:
Button Pad: (WS) Leaving a 6" tail, knotless ch 4. (To make a knotless ch, wrap yarn around hook and back over itself to make an "x". Holding the crossed yarn, chain 4.) Join w/sl st to form ring.
Ch 2 (does not count as st), dc in ring. Ch 1 w/edging bead. (Ldc in ring, ch 1 w/edging bead) 7 times = 8 ldcs w/beads after them. Ldc 2 plain = 10 dcs total. Join w/sl st to first dc.
First Motif: Ch 4 w/edging beads, ch 1 plain, ch 1 w/accent bead. TURN and make 2-tr cl in next st. Slide accent bead down to work (do not chain). Dc w/edging beads in next st. First motif made. (RS now facing.)
Remaining Motifs: Ch 4 w/edging beads, ch 1 plain, ch 1 w/accent bead. TURN and make 2-tr cl in previous dc. Slide accent bead down to work (do not chain). Dc w/edging beads in ch-6 space (insert hook under the beadless ch-1 between the 4 edging beads and the single accent bead).
Repeat motifs until bracelet measures desired length. Button may be sewn on now or later. Be sure to sew button to right side of bracelet.
Clasp Loop: Remove hook from work. Cut yarn, leaving a 15" tail. There should be 5 edging beads left on yarn. (Add or remove beads as necessary.) Turn work and re-insert hook in opposite direction so the tip is pointing towards the bracelet. Sc in dc (do not make turning chain.) Ch 5 w/edging beads. Sl st in beadless ch-1 space opposite. Check that button will fit through loop (adjust number of beaded ch st if necessary).
Pull yarn tail up and out through the slip st. Thread yarn on darning needle. Bring yarn through ch-6 space. Insert needle between bead and yarn strands of 5th beaded ch; pull through. Whipstitch around each ch of clasp loop (this will add stability to the loop and keep it from stretching out.) After final whipstitch, take yarn down through sc at base of loop. Weave in ends.
And you're done!
Sea Anemone Bracelet Phototutorial with Instructions in Plain English:
Button Pad
Leave a 6" yarn tail (this is for sewing on the button later).
Start with a Knotless Chain 4. (To make a knotless chain, wrap the yarn around the hook and back over itself to make an "x". Holding the crossed yarn, chain 4.)
Join with a slip stitch to form a ring. The ring will be pretty snug.
Now we're going to make the button pad.
Chain 2 (does NOT count as a stitch), then double crochet 1 in the ring. Slide an edging bead down next to the work...
...and chain 1, catching the bead in the chain.
Your next stitch will be a linked double crochet.
Instead of yarning over, insert your hook down and behind the horizontal bar in the middle of the first double crochet (see photo below).
Pull up a loop. (This loop replaces the yarn over of a traditional double crochet.)
Now you have 2 loops on your hook:
Insert your hook into the ring, pull up a loop, and finish as with a normal double crochet (yarn over and pull through 2 loops on hook, 2 times).
 |
| It looks a bit squishy, but it's a double crochet |
Slide another edging bead down and chain 1 to catch bead as before.
Repeat this pattern (make a linked double crochet, slide a bead down, chain 1 to catch bead) 7 more times = 8 linked double crochets, with a bead after each one.
Make 2 more linked double crochets
without beads. Now you have a total of 10 linked double crochets.
Notice that the beads are on the back of the work. The side facing you is the wrong side, and the other side is the right side.
Join final double crochet to first double crochet with a slip stitch. (Do not join to chain-2.)
 |
| Slip stitch to first dc (indicated by dots) |
 |
| Joined with a slip stitch |
Time to make a motif!
First Motif
Slide 4 edging beads within reach...
...then chain 4, catching 1 bead in each chain. (Remember to slide the bead down close to your work BEFORE you make the stitch.)
Now chain 1 with NO bead,
then chain 1 with an accent bead. Your work should look like this:
 |
First we chained 4 edging beads,
then 1 chain with no bead,
then 1 chain with an accent bead |
TURN your work, and make a 2-triple crochet cluster in the next stitch over.
(To make a 2-triple crochet cluster, yarn over twice, insert hook in indicated stitch, pull up a loop, [yarn over and pull through 2 loops] twice. This is a partial triple crochet; now you have 2 loops on your hook. Repeat to make another partial triple crochet; now you have 3 loops on your hook. Yarn over and pull through all 3 loops. Cluster made.)
Notice how the beads twisted themselves to the outside edge of the bracelet:
 |
2-triple crochet cluster made
in next stitch over |
Now slide an accent bead down to the work, but DO NOT CHAIN.
Instead, yarn over and get ready to make a double crochet with 2 edging beads. Be sure to keep that accent bead snugged up against your work.
You've yarned over. Now insert your hook into the next stitch...
...pull up a loop, slide an edging bead down close to work,
pull through 2 loops on hook (catching the bead),
slide another edging bead down,
and pull through the last 2 loops on hook (catching the 2nd bead).
 |
| Catching the first bead... |
 |
| ...and the second. |
Here it is! A beaded double crochet (on the left just under the working yarn). See how the silver accent bead snuggles up between the cluster and the double crochet?
Now we're ready to pick up the pace.
Remaining Motifs
Here's how all the rest of the motifs will be made:
Chain 4 with edging beads,
chain 1 with no bead,
chain 1 with accent bead.
TURN and take a look at that double crochet you just made. Your next cluster will be stitched in the top strands of that stitch (right above the accent bead).
Make a 2-triple crochet cluster in the top of the double crochet...
...slide an accent bead down (but do not chain)...
...
yarn over for the double crochet you are about to make...
 |
| Here's where the next stitch will go |
...insert hook into the chain-6 space on the opposite side, right between the 4 edging beads and the 1 accent bead...
...pull up a loop,
slide a bead down, yarn over and pull through 2 loops,
slide a bead down, yarn over and pull through last 2 loops on hook.
Congratulations! You just made another beaded double crochet, and finished another motif.
Your work should look like this:
 |
| 2 motifs complete! |
And now you know the stitch pattern - you'll have another motif done before you know it.
(Here's that stitch pattern again:
Chain 4 with edging beads, chain 1 with no bead, chain 1 with accent bead,
TURN, make 2-triple crochet cluster in previous double crochet,
slide an accent bead down (but do not chain),
yarn over, insert hook into opposite chain space under beadless chain 1,
make double crochet with 2 edging beads.)
 |
| Our bracelet is growing.... |
Once you get the pattern down, you'll find it goes very quickly.
Here we are with the bracelet almost done (all it needs is the button loop):
 |
The green prototype has come along to check out
the new purple kid on the block. |
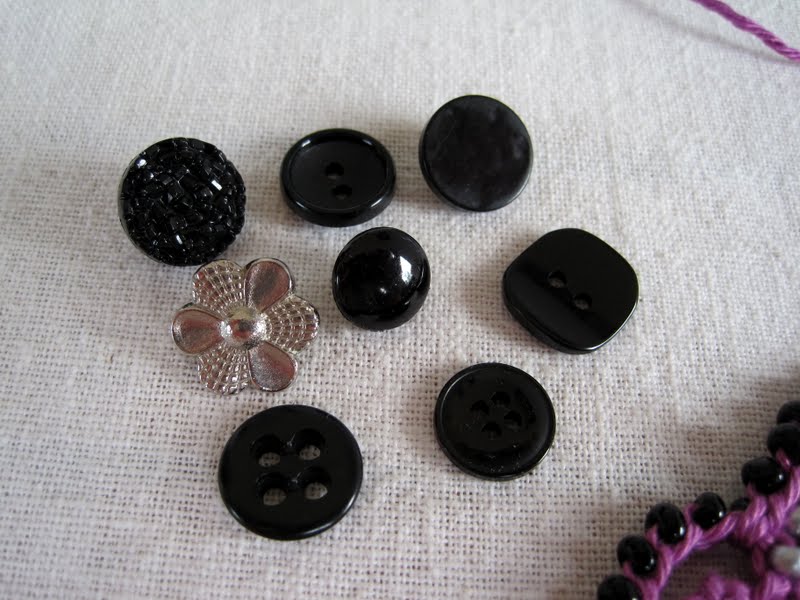
But wait! I never chose a button for this bracelet. (Blogger fetches button box and digs out a few candidates.) Which will be the lucky winner?
 |
"Pick me!"
"No, pick me!" |
And the winner is ... the silver flower. (Cheers and boos from the button box.)
You can sew the button on now, if you like, or wait until later. Remember to sew the button to the right side of the button pad - the side which shows the beads.
Meanwhile, back at the working end:
Double check your measurement to be sure your bracelet is long enough. (The tip of the final motif should touch the edge of the button pad.) Add or remove a motif if necessary to make it the right length. Remember to keep the fit snug as the bracelet will stretch.
Now cut the yarn, leaving a 15" tail. If you have any accent beads left on the yarn, remove them. You should only need 5 edging beads (6 at the most) to make the button loop. Re-string these beads if necessary.
To make the button loop:
Remove your hook from the work,
turn the work over,
and re-insert the hook so that it's pointing towards the bracelet...
...with the working yarn held behind.
Make a single crochet in the top of the double crochet you just made. (Do not chain 1 first.)
Now chain 5 with your edging beads...
...and slip stitch in the chain-1 space on the other side.
Check to see that your button will just fit through the loop. Adjust the button loop if necessary by adding or removing a beaded chain stitch.
(If you haven't sewn your button on yet, now is a good time.)
 |
| Button attached |
Ready to finish this baby? Here we go.
Pull the yarn up and out of the final slip stitch.
Thread the end on your darning needle. Because cotton yarn tends to relax and stretch, we're going to reinforce the button loop.
Bring the yarn down and through that last edging chain space...
...then up and under the bead at the top of the slip stitch. Pull the yarn all the way through.
Now whipstitch through each chain of the button loop (insert hook from back to front between bead and yarn of next stitch, and pull through), like this:
As you whipstitch each chain, the whipstitches will coil around the base of the stitches and stabilize them.
Here I have one whipstitch to go:
After the last whipstitch, take the yarn down through the single crochet you made at the beginning of the button loop, and weave in your yarn end.
 |
Ready to make the last whipstitch
and weave in the yarn end. |
Snip off any excess yarn, and admire your Sea Anemone bracelet.
Now get out your beads and start planning the next one....
You may do whatever you like with the items you make from this pattern, but you may not sell the pattern.
If you have any questions or find any mistakes, feel free to use the comment box below, or contact me in Ravelry.
Thanks for viewing, and happy summer crocheting!
~ ~ ~ ~ ~ ~ ~ ~ ~ ~ ~ ~